This article is the first of the series of articles that will help you to learn how to use built-in email system to take your performance to the next level.
When you run the application for the first time, you may need to your own outgoing account, that is, the email account you will use to send emails to your clients or colleagues. Please note that you can use different global company email accounts for all your outgoing emails, instead of your own personal one, but this will be covered in the next article. Below we will describe the setup of your personal outgoing email account.
The personal email account is used by the application for sending your emails, including emails to clients, emails based on templates, notifications, invoices etc.
To setup personal outgoing email account click “File” >> “Connection settings…” and select “Outgoing Email” tab in the “Edit Connection” window.
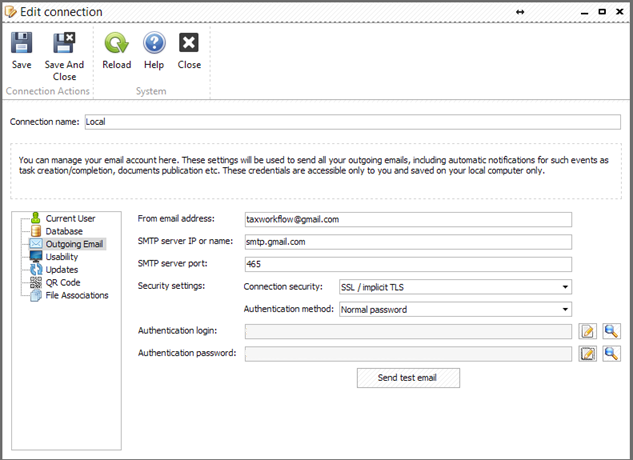
This form contains the following fields:
- “From email address” – specify your email address here
- “SMTP Server IP or name” – specify the IP address or domain name of the server your email account is registered at
- “SMTP server port” – depends on your POP and SMTP server’s settings (it is not recommended to use 25 port for the SMTP server, as it provides no encryption of the outgoing emails and can be subject to identity theft)
- “Connection security” – depends on your SMTP server’s settings (SSL/TLS is recommended)
- “Authentication method” – depends on your server’s settings
- “Authentication login” – encrypted user login to the SMTP server. Click the magnifying glass icon
 to decrypt it or the pencil icon
  to modify it
 - “Authentication password” – encrypted user password to the SMTP server. Click the magnifying glass icon to decrypt it or the pencil icon to modify it
If you are using a common post servers such as Gmail, AOL, etc. you can find the values to put in the fields listed above on your post server’s settings pages. Please refer to your email provider for these settings, or email us for help setting up your account if you experience issues with a certain mailbox.
For example, here are the settings for most popular email providers:
| Field name | Gmail | AOL | Office365 | Yahoo |
| From email address | yourname@gmail.com or yourname@yourdomain.com | yourname@aol.com or yourname@yourdomain.com | yourname@yourdomain.com | yourname@yahoo.com or yourname@yourdomain.com |
| SMTP Server IP or name | smtp.gmail.com | smtp.aol.com | smtp.office365.com | smtp.mail.yahoo.com |
| SMTP server port | 465 | 465 | 587 | 465 |
| Connection security | SSL / implicit TLS | SSL / implicit TLS | SSL / explicit TLS | SSL / implicit TLS |
| Authentication method | Normal password | Normal password | Normal password | Normal password |
To make sure everything works press “Send test email” button, enter an email where you want to send a test message, press “OK” and check the email for test message.
Please note that personal outgoing email account should be setup separately on each computer that you are using. Its settings are not stored in the database so each new installation, unlike the global outgoing accounts, so it will require a new setup every time you install TaxWorkFlow on a new computer.
Troubleshooting:
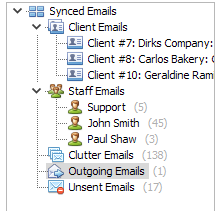
If for some reason your outgoing emails cannot be sent they will appear in the “Outgoing Emails” folder first. The system will try to re-send these messages during an hour and if all attempts are failed the messages will be moved to “Unsent Emails” folder. From here the system will try to send messages automatically each hour.
This often happens when your credentials were not accepted. For example, you changed your email password but did not update the TaxWorkFlow. If you go to your outgoing email settings and test it you will get an “Email Test Failed” message that will look like this:
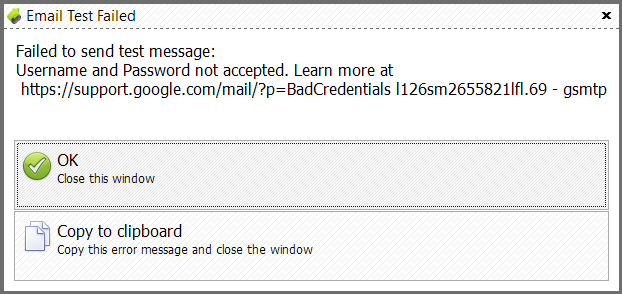
When you open an unsent email you will see an error message like this:

To fix this issue click “outgoing email settings” link and enter a new password in the “Authentication password” field of “Edit connection” window.
You can find detailed information about all the features in TaxWorkFlow’s online help or by clicking a Help button inside the application.